Pages

Showing posts with label cotton. Show all posts

Tuesday, February 18, 2014

What's Your Fancy?

Finally, the moment I've been waiting for:

I am releasing the pattern for my daughter's Faaancy sweater under the name "What's Your Fancy?"

While I had finished the last few details on the pattern itself last week, it has been so cold that of course I could not take my little one outside for a photo shoot.

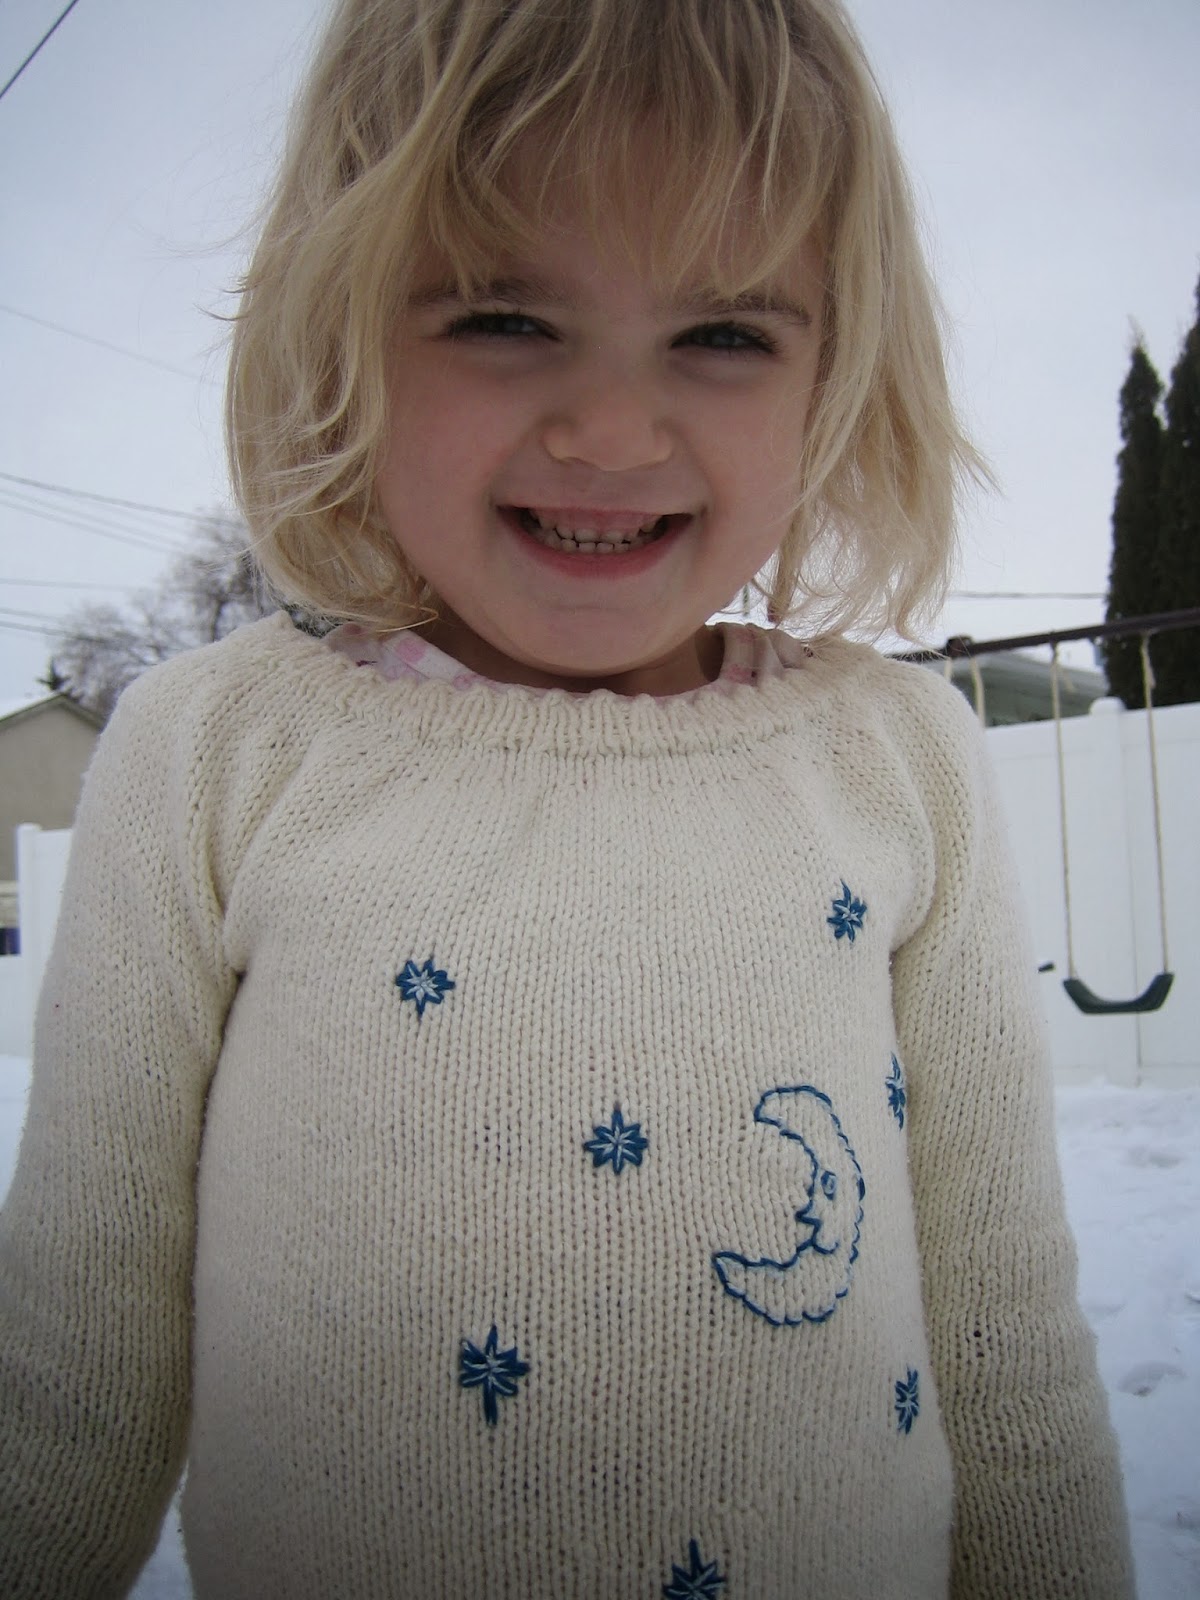
Luckily, we had a lovely weekend, so here we have "What's Your Fancy?" with all new photos. Yes there is snow on the ground, but it was nice and warm by our standards!


"What's Your Fancy?" is a slim-fitting seamless yoked child's pullover, knit in the round, with  optional Picot edgings on cuffs, collar, and hem.  A wide neck makes it easier for children to pull it over the head. To fit body chest measurement of 21(23, 25) inches [53(58, 64)] cm. The sweater is knit in Mirasol Lachiwa, a Pima Cotton and Linen blend.

The benefit of waiting until after a sweater is knit to add embellishment is that kids will often change their minds as to what they want on it. I believe my daughter asked for caterpillars, flowers, butterflies, little people, and faeries, depending on the day.

On the day the sweater was ready for embroidery, she asked for "the whole of outer space" but was, luckily for me, content with the moon and a few stars.

Suit the fancy of the child you love to knit for! "What's Your Fancy?" pattern is available for purchase through Craftsy (see sidebar), and Ravelry here:


Wednesday, August 14, 2013

The Next Thing


Finished: One blanket, named Log for it's log-cabinesque construction, crocheted in Knit Picks Billow. I more or less made it up as I went along, and really like the colours. Hopefully it finds a spot to make things cozy in my cousins' home! Best wishes and all happiness to the newly-weds!


On of course to the next project, though housework and yardwork do tend to get in the way of getting very far along with that! The weather is lovely now that it cools down a bit more at night after a hot day, and I must get out to mow the lawn tomorrow if I can!


Knitting in the shade after that would be a good plan too though! My youngest starts kindergarten soon, so I think she needs a new sweater...


Tuesday, July 09, 2013

Mind at Ease


What on earth is this, you may well ask!


It's rather clever and only a slight pain-in-the-neck.

It looks as much like an insect or a funny skiing guy as anything.

It's the shoulder straps, neckline, and armhole trim for the Admiral's Knot Halter by Ashley Rao.

Unfortunately, the completed project is way too big on me. I'd show you how big, but my camera has gone walkabout.

I swatched, and things look fine gauge-wise, but it looks like I should have picked the smallest size instead of the third size, what with the stretch in the cotton and the shaping taking care of any other issues. I could have done additional shaping if needed from there. It's a bit longer than  I'd like too, but again, size small would have handled that. I would have liked to have had ease information included in the pattern, as that may have helped me choose a better size; though nothing is foolproof of course, and I do feel rather a fool for not ignoring that "it's the wrong size" feeling at the back of my mind throughout.

Oh well, It might fit someone else I know, otherwise, I will have to pull it apart and knit something else. As much as I like the idea of this tank, I think I'd rather knit a quicker tank if I was to knit it all over again. Once was quite enjoyable though!

Tuesday, June 11, 2013

Buzz, Buzz!

As in, busy as a bee.

I can hardly believe it's been nearly a month since my last post, but between the kids' activities (dance, soccer, and I'm a coach for one of them), and the demands of my Gaelic Football club, we're very busy indeed, leaving not much time for blogging!

There's been not that much time for knitting either, but I'm getting a bit done while icing my knees (nothing terribly serious, I think, just inflamed and achy and stiff from all the football and the soccer coaching).


I'm taking a break from most of my projects to whip up a tank-top. I seldom if ever do summer knitting (it's not summer long enough to bother here), but when the latest Interweave Knits issue arrived, I found the Admiral's Knot Halter by Ashley Raoto be tempting enough to start nearly straight away. It helps that I had some yarn (Patons' Grace) that would work for it that I've always wanted to make a top from (OK, so less than a full ball, but it was the same colour, and I love it, so why not pick up some more)? I just need to hold it double for the trim, and it seems to be working alright so far.


I've been enjoying the last month or so despite the crazyness, but am looking forward to July, which looks fairly calm from this far away!

I haven't been out in the garden much either, other than to cut the lawn, but the dandelions are awful, awful, awful.

Luckily, the lupins are lovely, and so are the irises, so I'll leave you with that for today!


Wednesday, April 20, 2011

Modifying a Pattern to use Cotton


I have to admit, I finished this last week, but while it has been worn since then, I haven't had a chance to photograph it until today.


I have knit for my daughter the Ballet Top by Debbie Bliss, with a few modifications.
  One of those modifications was the Knit Picks Simply Cotton which was lovely soft stuff, but it does shrink. Not a problem; I just re-jigged the entire pattern for the cotton, and well-worth it. My daughter picked out the yarn, and she loves the cotton, its softness, its colour, and the resulting sweater.


Other modifications were to lengthen the sleeves somewhat, and to leave out the picot bind-off on the neckline edging, and thank goodness, as I would have run completely out of yarn. As it was, I had to unravel my swatch to knit the ties, as I had nothing left for that otherwise.

So, to re-jig a pattern for cotton that will shrink (and I did want this one to be an easy-care garment, regardless of the amount of care I will willingly give to my woolens, after all, if you look closely, you may find a speck or two of macaroni and cheese on it, so it will need washing more often than the woolens):

1. Swatch a decent sized swatch.

2. Measure the size of the swatch (not just the gauge), and take note.

3. Toss that swatch into your general laundry like you will the sweater.

4. Measure again, and note the percentage of difference with what you had before and what you have now, in either direction. Now, I suppose I could have just changed the gauge with bigger needles, but I really don't think that would have given me what I wanted, as the length changed a lot more than the width (25% in the length, 5% in the width). While the size of needles may have helped the width, I felt a lot more certain with my calculations than with playing around to find a gauge that suited the cotton and the pattern as well as I wanted without the whole thing ending up disappointingly shorter than intended. I think this may amuse those who know my horror of mathematics. To them I say, I can do math, as long as I have plenty of time and no distractions.

5. Add to the pattern numbers based on the percentages. Now, we're not changing the grading here, I still went with the size intended for 5-year-olds, but added additional length and width for where it would shrink. I also changed it so that I could knit the body in one piece instead of three, and did the sleeves separately in the round, so that I'd have less sewing to do (again, just as well, as I might have run out of yarn for sewing too).

6. Knit, sew together, knit the ties several times so that they come out even and use up the piddly bit of remaining yarn as efficiently as possible, weave-in ends, wash, and give to the kid to dance in and enjoy.

Wednesday, November 10, 2010

So Busy Sewing

I've been busy sewing lately, and have two finished objects to share.

First off, for my husband, a lunchbag (from One Yard Wonders by Rebecca Yaker and Patricia Hoskins)  :


When we were flipping through the book, my husband saw the pattern, and thought it would be a great idea, and could I make one for him sometime.  He wasn't sure what sort of fabric he'd like, and settled on something plain, with the quilting to dress it up.  Later, I realized I wasn't up to super fancy quilting, so I decided to look for fabric that was a bit more interesting.  Luckily, my daughter found this Batman fabric, so we snapped it up.  I finished most of it while my husband was out of town, so the Batman part was a surprise for him.  When he saw it, he said he'd be the coolest guy at work, and that all it was missing was a label a-la Adam West Batman reading 'Bat-Lunch'.  I was happy to oblige.


Next, for my daughter, a bag to carry her shoes and things to dance class:

 The bag she had been using was falling apart, so my husband suggested making her a special one including pockets for her tap shoes inside.  I had been wanting to try the drawstring bag from Sewing in No Time by Emma Hardy (the journal cover I made here is also from that book), so here was an excellent reason to make one.

My daughter picked out the fabric with me, stipulating that it be yellow.  I wanted to use two fabrics for this one, and, being pretty sure there would be at least one ballerina fabric, kept an eye out for one.  There was indeed, and on a lovely pale yellow background so that it paired nicely with the floral one we had selected first.

The pattern didn't have a pocket in it, so I added one to the bag, and hopefully reinforced it well enough down the middle and corners to last until her shoes are too big for the pockets.  If the bag is still in good enough shape at that point, I could always do up another pocket.  My version is very slightly smaller, as I um, sewed the pocket in sideways (even after checking carefully against the other piece to figure out which way was up), so, as I was in a hurry to get it done in time for dance class (I was right down to the wire on this one) I just pinned it with the pocket opening upwards, sewed it, and trimmed the edges that extended beyond.  Even then, the bag is fairly big, so there is lots of room for a water bottle, snacks, journal, shoes, and a change of clothes if needed.
All in all, I'm rather pleased.

Tuesday, October 26, 2010

Featuring Further Fall Flora and Finished Footwear


Carpathian Bellflower

Peachleaf Bellflower


I really enjoy the Campanula in my garden, especially since they keep surprising me with long blooming periods, and for putting up with frost and utter neglect.  I water them once in the spring, and then ignore them other than taking a few photos.  I have a set of Peachleaf bellflowers, and a set of Carpathian bellflowers, and they spread bit by seed, though not enough to be a nuisance.  As an added bonus, the bees seem to like them, and the foliage stays a lovely green well into fall. 


 And as for finished footwear, here they are, finished at last, one pair of Flame Wave Socks by Ann Budd, with slightly unusual increases :

They're a little big for me, but that's just fine since they're for my mother-in-law, who is wonderful and deserves nice socks (so hopefully they're really comfortable to wear).  I can't quite believe how long it took me to knit these, as it took almost no time for the second sock once I actually sat down and made myself work on them.  For some reason, I couldn't quite memorize the pattern.  It's not that it's a terribly tricky pattern or anything, but it just wouldn't stick in my head, so it was harder to convince myself to take the time to sit down with these and focus properly, at least until yesterday, when I had to ice my foot (due to an injury from indoor soccer caused by a collision with a player on the other team.  She went flying, but came out alright, and my foot is a little sore still, but much better than yesterday).  Now that I have actually taken time to knit these socks, they're done.  Imagine that.


Saturday, July 24, 2010

Crochet to Rock With

My friend is having a Rock Band party for her birthday, and the other day, my sister (who is also going) reminded me that we were supposed to dress accordingly in Rock Persona costumes.  My husband still isn't sure what he's going to wear, but I'm wearing my little black dress with some lacy black tights that my husband found for me, and I'm finishing off the outfit with more makeup and hair-product than I ever use, and a set of Ladylike Lace Gloves by MK Carroll.


Now, I only had a few hours today and a few hours yesterday to whip these up, so I made an abbreviated version with lots of modifications to make these speedy while trying to keep in touch with the quidditas of the original.  So, instead of enjoying the clever short-row shaping, I omitted it since these don't actually cover the wrists now that I made them slightly less than half the length.  
 
I grabbed some Patons Grace out of my stash, and did enough repeats of the lace pattern from the Ladylike Lace Gloves to fit around the hand (so the palm is the same as the back instead of half-double crochet).  I then seamed them with the final row of single crochet working inside out between the back loop of one row and the front row of the other side.  I skipped making a thumb by simply keeping to the back-loop-only side for the space I needed for the thumb, then back to seaming for the last three stitches.  
 
They still needed a bit of something, so I made a scalloped edge along the lower half (after turning them right-side out), and then edged the top.  I wove in ends, and that was all.  So, in less than four hours, I have a set of fingerless gloves that, while nowhere near as elegant as the original, nonetheless rock.  

I might even share a photo or two of the full costume if the pictures turn out OK.  Speaking of pictures, I must say, it's really hard to take pictures of your hands without using your hands.

Tuesday, June 08, 2010

Quick Fix Tutorial

A while back, the buckle on my daughter's overalls broke off (followed shortly by the other one).  As these were my favourite pair and kids grow so fast, I wanted to fix them quickly.  So, I did a quick bit of crochet, and the overalls were again wearable.  I had a few requests to publish the pattern, but didn't really get to it, as it doesn't really seem like a pattern.  The idea seemed somewhat intuitive to me, but, as different things are intuitive to different people (and goodness knows, there's plenty of things I would still be clueless about if it were not for the fine tutorials that abound in the world of craft blogs), when another buckle broke on a pair of overalls this year (really), I thought I'd do up a quick tutorial after all. Here goes:

Quick Fix

Materials:
  • Item that needs fixing in this manner, such as overalls sans buckle
  • Crochet cotton, in this case J&P Coats Royale Metallic Crochet Thread (though spare laceweight or fingering would likely do)
  • Crochet hook.  Here I'm using a steel 2/2.75 mm, but whatever seems small enough to work with your yarn is fine.
1.Foundation Single Crochet (FSC)* until your row is just bigger (by one or two stitches) then the overall strap (in this case, I used 10 sts).  Keep on with the FSC until you have twice that number (or slightly less if you want a tighter 'buckle').  Move your work into place around the overall strap, then slipstitch to your first stitch.  Ch 1, turn.
 
2.SC to middle of upper row (half the stitches, less two for the sides, in this case, 4 sts), then chain enough to fit your button snugly (it will stretch a bit, but probably shrink in the wash too, so aim for just right.  I chained 7 stitches for this one).  Rejoin with a SC in the next stitch, then SC across the remainder of the topside row. (Here, 15 sts total, being 8 SC and 7 Chain stitches). Ch 1, turn.


3.Working back across topside row, SC2Tog, SC2Tog, SC (number of chains in loop, in this case 7) into loop, SC2Tog, SC2Tog.  (About the SC2Togs: If you have a different number of stitches, do whatever combination of SC2Togs and SC that makes sense for symmetry.  You can also just SC instead of SC2Tog if you like for that matter; I just liked how it looked).
4.Tie off, weave in ends, and enjoy your clever rescue of a perfectly good piece of clothing that had nearly been wrecked by a silly bit of weak metal.


This particular sample of mine turned out a bit loose, which is fine, since the overalls are adjustable.  If your garment/object requires more precision, then use less stitches in your original foundation to make the 'buckle' tighter.


*If you haven't tried Foundation Single Crochet before, well, really.  You must.  It's the best thing since sliced bacon (as my husband points out, ever since buying both unsliced bread and bacon, bread is way easier to slice neatly), and futuregirl.com has a great tutorial (just click on tutorials, over on the top left of the main page).

Wednesday, January 13, 2010

Even More Instant


Just a quick little post today!  I just whipped up a baby hat in Bernat Organic Cotton for a friend who should be having a baby any time now, and was pleased with how soft and drapey the cotton was as it knit up.  I think I'll use it for a vest I'm planning for my eldest.  Anyway, this pattern is Flour sack by Amanda Keeys, and I really enjoyed making it.  I think it's an adorable hat, and I hope the new baby comes soon.