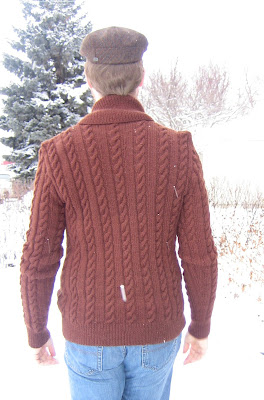
I'm so happy that I have finished
knitting my husband's cardigan (#17 Man's Cable Cardigan
by Josh Bennett), and he is very
pleased with it as well!
I had bought this issue of Vogue Knitting
almost entirely because I felt my husband needed this sweater, and
now I'm even more sure that I'm right about that. I finished it in
less than a year, which is pretty good when you consider that the
first sleeve went OK, then the next one sat around being just a cuff
for a very long time. I'm sure it would have taken a lot less time if
I hadn't knit or crocheted 32 other projects in the meantime.
As it's a classic sweater, when I pulled out the camera, my husband took
up the required classic pose, but couldn't quite keep a straight face.
I knit this sweater in Paton's Classic
Wool, Chestnut. The only change I made, besides knitting the sleeves
in the round, was to add pockets. With a cursory search, I didn't
find quite what I wanted in the way of instruction for adding pockets
the way I wanted to, so I swatched my idea, and as it
worked quite well, I have in-depth details below.
- Having figured out your gauge, measured the hand in question, figure out the number of stitches, and doubled them to make enough for both sides of the pocket. Make a crochet chain, in the same weight yarn, several stitches longer than you will need for the pocket.
- Determine distance from side-seam to add pockets and select the purl section nearest to this.
- On the Wrong Side, Knit in pattern to this point, then pick up the number of pocket stitches needed from the crochet chain. Knit in pattern to next pocket location, and repeat. I had to connect two cables together with a nifty little joiner to have a long enough cable to work all these stitches.
- Knit in pattern, purling the pocket stitches on the right side, and knitting them on the wrong side, until your pocket is tall enough.
Carefully unzip the provisional cast-on, placing half the stitches on one double-pointed needle, and the other half on another. Perform the three-needle bind-off. There will be a slight gap at the point where you joined the pocket, but this can be tidied up with the finishing work later. Repeat for second pocket.
Double-check that the pocket is indeed tall enough (it's a bit easier to measure against a hand with the one edge finished), and if it is, knit in pattern to pocket section, place half the stitches on one double-pointed needle, and the other half on another. Perform the three-needle bind-off. Again, there will be a slight gap, but it will close up nicely later. The pockets may extend a touch beyond the sweater edge at the moment, but the wide button-band will cover it quite well later.
- Once the sweater is complete, sew up the gaps, and gently whip-stitch the top edge of the pocket to the sweater. Be sure to do this with the pockets facing in the correct direction (luckily I had my husband try the pocket out before sewing the second one backwards too). The whip-stitch does show a very little bit on the right side, but not that much, and I am very pleased with these nearly invisible pockets!
My husband, being a good sport, even went out into the welcome-to-spring snow we had flying yesterday (it might still be snowing, but it's early enough that I haven't looked out the window yet), and all for the sake of sharing sweater photos with you.
I'm so glad I knit this sweater; my husband's enjoyment of it makes each and every stitch worthwhile, and I must say, he and the sweater are both looking fine!


No comments:
Post a Comment